I get it, and drawing stitches can seem tough at first. But trust me, it doesn’t have to be. stitch tekenen makkelijk is all about making it simple and fun.
You might think, “I’m not an artist.” I hear you. But with the right steps, anyone can do it. This guide breaks it down so you can follow along easily.
We’ll go through each step, and by the end, you’ll be drawing stitches like a pro. No fancy tools or years of practice needed. Just a bit of patience and some clear instructions.
So, are you ready to give it a try? Let’s dive in.
Understanding Stitches: Types and Uses
Stitches are the building blocks of sewing, embroidery, and even some forms of art. They hold fabric together and can add decorative elements to your projects. I remember when I first started, I thought all stitches were the same.
Boy, was I wrong.
Definition of Stitches
Stitches are essentially loops or lines of thread that secure or embellish fabric. In sewing, they keep seams strong, and in embroidery, they create intricate designs.
And in art, they can be a medium for expression.
Types of Stitches
Let’s talk about some common stitches, and the straight stitch is the most basic. It’s just a simple line of thread.
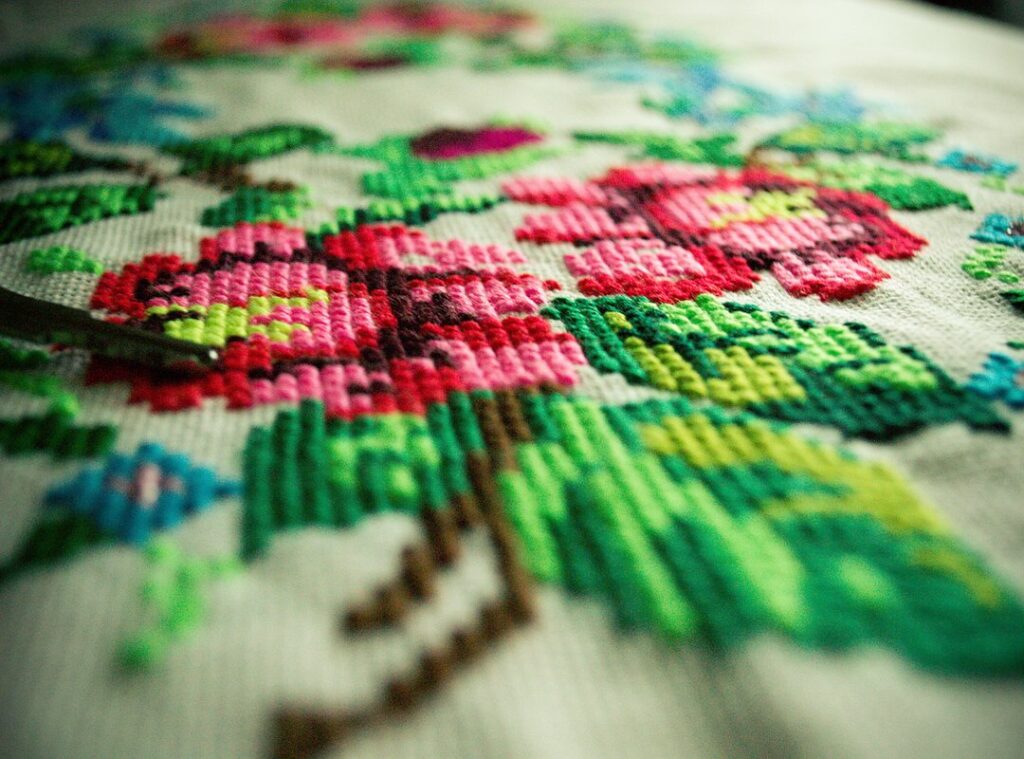
The backstitch is great for outlining because it’s strong and neat. The running stitch is quick and easy, perfect for basting. And the cross-stitch, well, it’s a classic in embroidery, forming X-shaped patterns.
Uses of Stitches
Stitches have both functional and decorative uses. Functionally, they hold fabric together, like in a seam. Decoratively, they add texture and design.
I once tried to use a running stitch on a heavy fabric, and it didn’t hold up. Lesson learned: always match the stitch to the fabric weight.
In embroidery, stitches can turn a plain piece of fabric into a work of art. But here’s a tip: don’t overcomplicate it. Start with simple designs and build from there. stitch tekenen makkelijk, right?
Keep it simple, and you’ll see better results.
Understanding stitches isn’t just about knowing their names. It’s about knowing when and how to use them. Trust me, a little knowledge goes a long way.
Materials and Tools You Need
When it comes to stitch tekenen makkelijk, having the right materials is key. Start with the basics: paper, pencils, erasers, and rulers. These are your go-to tools for getting started.
For more precision, fine-tip pens and markers can make a big difference. Tracing paper is also handy if you want to transfer designs without starting from scratch every time.
Setting up your workspace is just as important. Good lighting is a must. Natural light is great, but a good desk lamp works too.
Keep your area organized. Clutter can distract you and slow down your work.
Think about what’s next. Once you have your materials, you might wonder how to store them. A simple drawer organizer or a small caddy can keep everything in place.
This way, you’re always ready to dive into your next project.
Step-by-Step Guide to Drawing Stitches
Drawing stitches can be a fun and relaxing way to add detail to your artwork. But let me tell you, I’ve made my fair share of mistakes along the way.
Basic Straight Stitch:
Start by drawing a straight line. The key is to keep the thickness consistent. Too thick, and it looks clumsy.
Too thin, and it’s barely noticeable. I learned this the hard way when my first attempts looked more like scribbles than stitches.
Spacing is also crucial, and keep the lines evenly spaced. It took me a while to get this right, and I had to redo a lot of my early work.
Backstitch:
The backstitch is a bit trickier. You need to overlap the lines slightly to create a continuous look. When I first tried, I overlapped too much, and it ended up looking messy.
Practice makes perfect. Start with short, overlapping lines and gradually increase the length as you get more comfortable.
Running Stitch:
For a running stitch, focus on creating a continuous, even pattern. This one requires a steady hand. I used to rush through it, and my lines were all over the place.
Take your time. Draw each line carefully, making sure they are evenly spaced and parallel. It’s all about patience and precision.
Cross-Stitch: The cross-stitch involves forming an X, and alignment is key here. If the Xs are not aligned, it can ruin the whole design. stitch tekenen makkelijk
I once drew a series of misaligned Xs, and it looked like a child’s drawing. Not exactly what I was going for.
To get it right, draw the first diagonal line, then the second, making sure they intersect at the center. It might take a few tries, but it’s worth it.
Pro Tip: Use a ruler or a straight edge to guide your lines. It helps a lot, especially when you’re just starting out.
Remember, stitch tekenen makkelijk is all about practice and learning from your mistakes. Don’t get discouraged if it doesn’t look perfect at first. Keep at it, and you’ll see improvement in no time.
Tips and Tricks for Better Results

Consistency is key in any form of art. Maintaining consistent line thickness and spacing can make your drawings look more polished. One way to do this is by using a ruler or a grid.
It helps you keep your lines straight and evenly spaced.
Practice makes perfect. Regular practice is the best way to improve your skills and build confidence. Set aside a few minutes each day to draw.
Even if it’s just doodles, the more you draw, the better you’ll get.
Using references is another great tip. Reference images and templates can help you enhance your drawing. They give you a starting point and something to compare your work against.
This is especially useful when you’re learning new techniques or styles.
Pro Tip: Try using stitch tekenen makkelijk. It’s a method that simplifies the drawing process, making it easier to achieve the results you want.
- Find a reference image or template.
- Start by lightly sketching the basic shapes.
- Gradually add details and refine your lines.
By following these tips, you’ll see noticeable improvements in your drawing. Consistent practice and the use of references are backed by studies showing that deliberate practice and visual aids significantly boost skill development.
Common Mistakes and How to Avoid Them
Uneven lines can be a real headache. I’ve been there, staring at a stitch drawing that looks more like a wobbly mess than the masterpiece I envisioned. To avoid this, take your time and use a ruler or a straight edge.
It’s not cheating; it’s smart.
Incorrect spacing is another common issue. It’s easy to get carried away and end up with stitches that are too close or too far apart. My advice?
Mark your fabric lightly with a pencil before you start. This way, you can keep an even distance between each stitch.
Overworking the drawing is a trap many of us fall into. We add one more detail, then another, and before we know it, the design is cluttered. Know when to stop.
Sometimes, less is more. A simple, clean design can be just as impactful.
Stitch tekenen makkelijk is all about keeping things straightforward. Don’t complicate it more than you need to. Trust me, your final piece will thank you.
FAQs: Answers to Common Questions
Q: What if I make a mistake, and a: Mistakes happen. Trust me, I’ve made plenty.
The key is to not let them stop you. Just take a deep breath, undo the stitches, and start over. It’s all part of the learning process.
Q: Can I use different colors, and a: Absolutely! Using different colors can really bring your stitch drawings to life.
Experiment with various shades to add depth and personality. Just make sure the colors complement each other.
Q: How long does it take to get good at this?
A: It varies for everyone. Some people pick it up in a few weeks, while others might take a couple of months.
The important thing is to practice regularly. After about three months of consistent practice, you’ll likely see a big improvement.
stitch tekenen makkelijk is all about enjoying the process and not getting too hung up on perfection. Keep at it, and you’ll get there!
Mastering the Art of Drawing Stitches
This guide covers the essential techniques and tips for stitch tekenen makkelijk. With a bit of practice, you can create realistic and beautiful stitch patterns. The key is to start with simple lines and gradually add more detail.
Remember, the process is as enjoyable as the result. Anyone can master this art form by following the right steps and dedicating time to practice. So, grab your pencil and paper, and dive into the creative world of drawing stitches.
Enjoy the journey and have fun!
 Richards Lambusteder has opinions about interior styling ideas. Informed ones, backed by real experience — but opinions nonetheless, and they doesn't try to disguise them as neutral observation. They thinks a lot of what gets written about Interior Styling Ideas, Practical Home Makeover Tips, Decorad Space Optimization Techniques is either too cautious to be useful or too confident to be credible, and they's work tends to sit deliberately in the space between those two failure modes.
Reading Richards's pieces, you get the sense of someone who has thought about this stuff seriously and arrived at actual conclusions — not just collected a range of perspectives and declined to pick one. That can be uncomfortable when they lands on something you disagree with. It's also why the writing is worth engaging with. Richards isn't interested in telling people what they want to hear. They is interested in telling them what they actually thinks, with enough reasoning behind it that you can push back if you want to. That kind of intellectual honesty is rarer than it should be.
What Richards is best at is the moment when a familiar topic reveals something unexpected — when the conventional wisdom turns out to be slightly off, or when a small shift in framing changes everything. They finds those moments consistently, which is why they's work tends to generate real discussion rather than just passive agreement.
Richards Lambusteder has opinions about interior styling ideas. Informed ones, backed by real experience — but opinions nonetheless, and they doesn't try to disguise them as neutral observation. They thinks a lot of what gets written about Interior Styling Ideas, Practical Home Makeover Tips, Decorad Space Optimization Techniques is either too cautious to be useful or too confident to be credible, and they's work tends to sit deliberately in the space between those two failure modes.
Reading Richards's pieces, you get the sense of someone who has thought about this stuff seriously and arrived at actual conclusions — not just collected a range of perspectives and declined to pick one. That can be uncomfortable when they lands on something you disagree with. It's also why the writing is worth engaging with. Richards isn't interested in telling people what they want to hear. They is interested in telling them what they actually thinks, with enough reasoning behind it that you can push back if you want to. That kind of intellectual honesty is rarer than it should be.
What Richards is best at is the moment when a familiar topic reveals something unexpected — when the conventional wisdom turns out to be slightly off, or when a small shift in framing changes everything. They finds those moments consistently, which is why they's work tends to generate real discussion rather than just passive agreement.